DHCPv4 with DNS registration
Dnsmasq can be used as a DNS forwarder. Though in our recommended setup, we will not use it as our default DNS server.
We will use Unbound as primary DNS server for our clients, and only forward some internal zones to Dnsmasq which manages the hostnames of DHCP registered leases.
This requires Dnsmasq to run with a non-standard port other than 53.
DNS Configuration
- Go to Services ‣ Dnsmasq DNS & DHCP ‣ General and set:
| Option | Value |
|---|---|
| Enable | X |
| Listen Port | 53053 |
- Press Apply
Afterwards we can configure Unbound to forward the zones to Dnsmasq.
- Go to Services ‣ Unbound DNS ‣ General and set:
| Option | Value |
|---|---|
| Enable | X |
| Listen Port | 53 |
-
Press Apply
-
Go to Services ‣ Unbound DNS ‣ Query Forwarding and create an entry for each DHCP range you plan to configure.
In our example, we configure query forwarding for 2 networks:
lan.internal-192.168.1.0/24
guest.internal-192.168.10.0/24
lan.internalguest.internal
| Option | Value |
|---|---|
| Domain | lan.internal |
| Server IP | 127.0.0.1 |
| Server Port | 53053 |
- Press Save and add next
| Option | Value |
|---|---|
| Domain | 1.168.192.in-addr.arpa |
| Server IP | 127.0.0.1 |
| Server Port | 53053 |
- Press Save and Apply
Note
The first entry is for the forward lookup (A-Record), the second for the reverse lookup (PTR-Record).
Tip
If all PTR records for 192.168.0.0/16 should be handled by Dnsmasq, creating a single entry with 168.192.in-addr.arpa is enough.
| Option | Value |
|---|---|
| Domain | guest.internal |
| Server IP | 127.0.0.1 |
| Server Port | 53053 |
- Press Save and add next
| Option | Value |
|---|---|
| Domain | 10.168.192.in-addr.arpa |
| Server IP | 127.0.0.1 |
| Server Port | 53053 |
- Press Save and Apply
Note
.internal is the IANA and ICANN approved TLD (Top Level Domain) for internal use. If you instead own a TLD, e.g., example.com, you could create a zone that is not used on the internet, e.g., lan.internal.example.com.
DHCP Configuration
Now that we have the DNS infrastructure set up, we can configure DHCP.
- Go to Services ‣ Dnsmasq DNS & DHCP ‣ General and set:
| Option | Value |
|---|---|
| Interface | LAN, GUEST (The network interfaces which will serve DHCP, this registers firewall rules) |
| Do not forward to system defined DNS servers | X (Unless Domains are specified in Dnsmasq: Domains, this will disable forwarding behavior) |
| DHCP fqdn | X |
| DHCP default domain | internal (or leave empty to use this system’s domain) |
| DHCP register firewall rules | X |
Note
DHCP fqdn will do two things:
-
Make sure all devices are registered in DNS with the configured domain name appended, e.g.
smartphone.lan.internal. This ensures thatsmartphonecan exist in bothlan.internalandguest.internal. -
Register the DHCP domain name as local, which will make Dnsmasq authoritative for this domain, ensuring
NXDOMAINis returned for devices querying unknown hostnames within this local domain.
- Press Apply
As next step we define the DHCP ranges for our interfaces.
- Go to Services ‣ Dnsmasq DNS & DHCP ‣ DHCP ranges and set:
LANGUEST
| Option | Value |
|---|---|
| Interface | LAN |
| Start address | 192.168.1.100 |
| End address | 192.168.1.199 |
| Domain | lan.internal |
- Press Save and Apply
Note
If a host receives a DHCP lease from this range, and it advertises a hostname, it will be registered under the chosen domain name. E.g., a host named nas01 will become nas01.lan.internal. A client can query this FQDN to receive the current IP address.
Attention
If you plan to use partial IPv6 addresses in ranges with a constructor, enable the advanced mode and set Domain Type to Interface. This will register any subnets on the chosen interface to the selected domain. This is the only way dynamic DNS registration succeeds when the IPv6 prefix is dynamic.
| Option | Value |
|---|---|
| Interface | GUEST |
| Start address | 192.168.10.100 |
| End address | 192.168.10.199 |
| Domain | guest.internal |
- Press Save and Apply
Tip
Creating a DHCP range will automatically send out common DHCP options to requesting clients, without explicitly configuring them.
This is an incomplete overview which highlights some default DHCP options:
| DHCP Option | Default | Description |
|---|---|---|
| router\[3\] | IPv4 address of the interface that received the DHCP Request. | The default gateway the client should use. In this case the OPNsense. |
| dns-server\[6\] | IPv4 address of the interface that received the DHCP Request. | The DNS server the client should use. In this case Unbound on the OPNsense. |
| domain-name\[15\] | Domain set in a DHCP Range, or the default system domain if none could be matched. | The domain name the client should use, to construct short names to FQDNs in DNS lookups |
| client fqdn\[81\] | A combination of client hostname and domain, the result of the DDNS registration. | The full qualified domain name the client should use. |
Note
Only some usecases require setting these options manually, e.g., the IPv4 address of the router and dns-server in high availability setups with CARP.
Attention
If Dnsmasq does not start, check that ISC-DHCP and KEA DHCP are not active since they will block the bindable ports this DHCP server requires. It is also a good idea to check Services ‣ Dnsmasq DNS & DHCP ‣ Log for the error message.
Now that the setup is complete, the following will happen in regards of DHCP and DNS.
-
A new device (e.g. a smartphone) joins the LAN network and sends a DHCP Discover broadcast.
-
Dnsmasq receives this broadcast on port 67 and responds with a DHCP offer, containing an available IP address and DHCP options for router[3] and dns-server[6].
-
The device sends a DHCP request to request the available IP address, and possibly send its own hostname.
-
Dnsmasq acknowledges the request.
Our smartphone now has the following IP configuration:
-
IP address:
192.168.1.100 -
Default Gateway:
192.168.1.1 -
DNS Server:
192.168.1.1
At the same time, Dnsmasq registers the DNS hostname of the smartphone (if it exists). Since we configured the FQDN option and domain in the DHCP range, the name of the smartphone will be: smartphone.lan.internal..
When a client queries Unbound for exactly smartphone.lan.internal., the configured query forwarding sends the request to the DNS server responsible for lan.internal. which is our configured Dnsmasq listening on 127.0.0.1:53053. Dnsmasq responds to this query and will resolve the current A record of smartphone.lan.internal. to 192.168.1.100, sending this information to Unbound which in return sends the response back to the client that initially queried.
Tip
You can usually resolve a hostname in your network by querying for e.g. smartphone. This works because client systems recognize that a FQDN is not used, and will therefore suffix the request with their domain name received from Dnsmasq, transforming the query to smartphone.lan.internal..
As you can see, this is a highly integrated and simple setup which leverages just the available DHCP and DNS standards with no trickery involved.
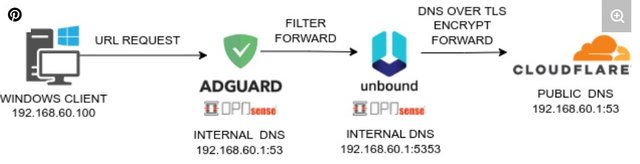
Adguard Home + Unbound
Using Adguard Home can be used to filter forwarded DNS requests, while Unbound + DNSmasq will forward using DNS over TLS as an upstream and resolve local IPs. These are useful to be used alongside eachother. The flow would be:
Setup
To allow this, you need to set Adguard home as the Primary DNS under Services > Adguard Home > General
-
This will now set Adguard Home as primary DNS, running on port 53
-
Since Adguard Home will run on port 53, you need to change Unbound to run on a different port, I used 5335
- Do not use 5353 - this is a reserved port for mDNS.
-
Go to the Adguard WebUI at opnsense.internal:3000
-
under Settings > DNS Settings:
- Set you upstream DNS to
opnsense.internal:5335 - Set Private reverse DNS servers to
opnsense.internal:5335
- Set you upstream DNS to